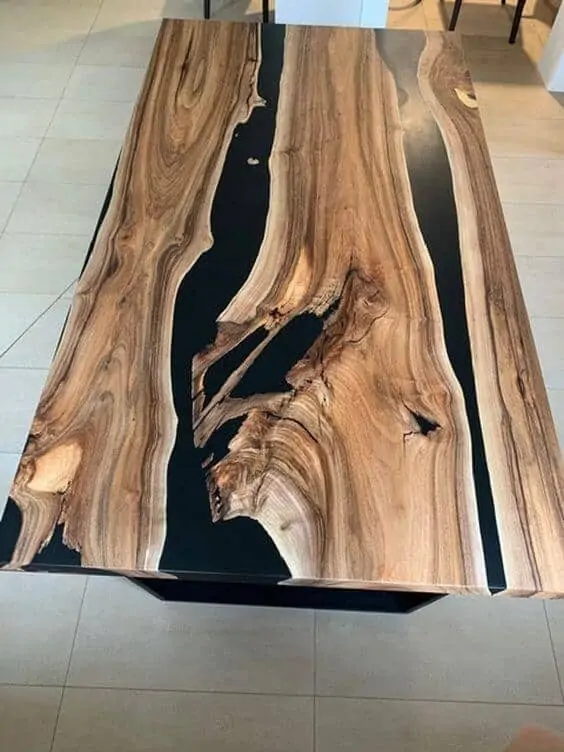
Resin is a composite that imitates products such as stone and metal, making it durable and affordable. In order to start talking about resin, it is essential to mention the epoxy resin, which is the primary material that once solidified forms a glossy and resistant layer.
I am sure that you have seen one of the most common and trendy tables of all:
The river resin table. It is a trend since 2019, and it will continue to be one in 2021 and 2022.
The idea of this trendy furniture comes from the match between the elegance of the wood and the modernity of the epoxy resin, creating an excellent final product.
But what are the advantages of having a resin table? Is there more than one style? Where can you find one?
Keep reading for the answers.

Resin can be natural or synthetic, and the production starts on the cracking process, which is the separation of the molecules.
Aside from furniture, resin is also used for various other objects such as Adhesives, Jewelry, Medical Devices, and Decorations.

Pros when working with resin:
- Different properties
- Quickly colored, dyed, and with a variety of different effects
- Easy to work with
Cons when working with resin:
- Some resins can be toxic.
- Need special storage (different types of resin can be sensitive to temperature).
Resin tables can vary from DIY looking to the fanciest dining table you will ever have. It all depends on the effect you are looking for and the properties you are interested in.
The resin is easy to work with because of the filling capacity, allowing it to join several elements together and keep it firm.
Also read : New Dining Room Wall Art/Decor Trends and Ideas
Resin Table Styles
The elegance of wood and the modernity of the resin make the tables fit for every space. Let’s look at some examples:
Live edge table with a beach effect

Coffee Table with live edge wood and resin river
Source: Pinterest
Processing Techniques
There are different ways for this process to be done. The most common are union and filling.
Union: By using this technique, the craftsman chooses to insert the resin on the wood’s imperfections, making it look natural and unique.

Filling: Using this technique, the craftsman uses the resin as a ‘glue’ and places it between the two planks of wood, creating a flow, mostly known as resin river.

Process of resin table by filling technique

Resins can be easily colored or left with a minimal and transparent look.
How long will my resin table last?
Like every other product, it all depends on how you handle it from the beginning. Purchasing from trustworthy sources and asking the right questions play a significant role while doing it.
A resin table can go up to 20 + years without significant repairing. Of course, they are expensive; therefore you want to buy reliable products.
Another important factor to have a long-lasting product is the cleaning routine. Here are a few tips on how to clean it properly:
- NO alcohol allowed: Unless you want to remove epoxy from a surface, this is a no-go. It will only damage your product. You can use water and soap instead.
- Don’t use abrasives: I know they are easy to find, but all-purpose cleaners will only create an unpleasant look for your table. Wax products are also a no-go.
- Clean ASAP: If you spill something on your tabletop, don’t wait and let it sink; clean immediately. A towel will do, as it Is a soft material.
- Steam cleaning: We have mixed feelings about this cleaning method, as the heat coming from the steam cleaning might make your resin weaker, but at the same time, it will make it easy to wipe out any stain you might have.

DIY Resin Tables
If you, like many of us, like DIY projects, this segment will help you put your creativity into practice and create a unique DIY Resin table. It might get complicated, but think about the final result and you’ll have plenty of fun.
You will need:
- EPOXY Resin
- Wood (your choice for the effect you are going for)
- Tinting pigments
- Double-sided tape and regular tape
- Polypropylene sheet
- Polishing compound
- Abrasives
- Spreader and mixing sticks
- Cups for mixing
- Epoxy adhesives
- Safety equipment
- Glue gun
- Digital Scale.
Remember to work in a dry and heated space, with at least 68 degrees Fahrenheit while you’re working on your table.
Preparing your wood:
When purchasing your wood, you can ask for recommendations, but the bottom line is that wood must be as dry and flat as possible.
If you don’t have the tools to cut your piece of wood yourself, nothing to worry about, you can ask the supplier to prepare it for you. The cut should be in half for the river effect.
Sealing the wood and getting ready to fill the knots:
- Before anything else, look for cracks and holes on the top and bottom and fill them with resin.
- Don’t forget to use tape to seal the cracks and holes to make sure the resin doesn’t run out.
- Leave it to solidify
Container
It is almost time to fill the river, and for that, you might want to create a container around the whole wood piece, around 8 cm bigger than your table (on each side.)
Create a base under your pieces of wood: It can be MDF. After that, using polypropylene sheets, and cut side barriers to create a container around the wood.
Using a hot glue gun, glue the polypropylene to the MDF base and sides, making sure it is tight, and the resin won’t be able to leak.
Handling the Resin
Whether you choose transparent or another color, it is up to you. You can use this calculator to check the proper quantities depending on your project.
- Add the color pigmentation to your resin, and mix it.
- Add the right amount of hardener to the colored resin and keep mixing.
- Transfer to another container and keep mixing.
Base Layer
The mix you just did on the step above is called a base layer, and now it’s time to add it to your properly cut wood. This step is vital as it can avoid bubbles.
Cover the whole base area with the resin. Place both of your wood planks in the correct position (on top of the resin. With a brush, make sure to seal the edges and top of the surface, including holes and knots.
B stage
B stage is the name given to the moment when the resin is starting to become thick but still soft.
To make sure you reached this stage, do the following:
Using a glove, touch the resin, and if it leaves a stain but doesn’t stick to the glove, you have reached B stage, and you are on the right path.
If the resin passes the B stage, it will not chemically bond to the next layer, so pay attention!
River: First Layer
The very first layer of your river is essential:
- Measure your pre-pigmented resin and mix with the right amount of hardener
- Transfer to another container and keep mixing
- Pour your mixture into the river channel.
If you wish to remove any bubbles, use a heat gun, and leave it to harden.
River: Second Layer
The second (and almost) final layer arrived!
Once the previous B stage has been reached, you can repeat the steps for pouring the second part of your river.
If necessary, repeat the steps until the river is full, always thinking about the B STAGE.
- Final steps and considerations:
Suppose you got it till here, kudos! It was not easy!!
If you are looking for a high glossy final product, this next step can be avoided; if not, you can use a router set up over the wood to achieve a flat and even surface.
For the legs, you can choose the same color as the tabletop or metal. It depends on the style you are going for. You can find pre-made legs to purchase, or you can DIY this part too!
To finish the table, don’t forget to seal the wood; you can choose the look you want and select your sealer depending on that.
Polish your unique table, and you are done!
Check out an inspiration video by clicking here
Find unique Resin Tables here
Conclusion:
- Resin tables will continue being a trend for years to come, as they have different styles and color variations, fit for every environment.
- They can be expensive, but they can last up to 20 + years with the right care.
- If you don’t find any fit for you in the market, you can DIY it and have a fantastic final product.
Enjoy your stylish resin table!
Do you want latest Trends straight to your inbox?
Thank you for subscribing.
Something went wrong.


